
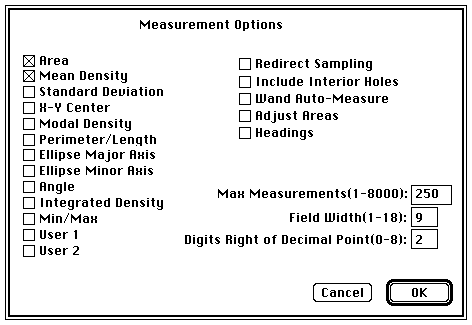
Particles smaller than Min Particles Size
or larger than Max Particle Size
will be ignored. Note that the sizes must be specified in pixels. Checking Label Particles
causes Analyze Particles to draw a number, corresponding to the measurement number,
on each particle found. Check Outline Particles
if you want particles to be outlined (this currently only works for density sliced
images). Checking Ignore Particles Touching Edge
causes Analyze Particles to ignore particles touching the edge of the image. Interior
holes in area and mean density computations are included if Include Interior Holes
is checked.
Use the Export command to save the measurements as a tab delimited text file that
can be opened by many Mac programs, including Excel, StatView and KaleidaGraph. Or,
as a shortcut, type command-S when the Results window is the active. For correct
display, it may be necessary to adjust tab settings when opening an exported file with a word
processing program such as Microsoft Word. Hold down the option key (or check Headings
in Options) when Exporting (or Copying) results to include column and row headers.
Use Print (command-P) to print the measurements, and Copy (command-C) to copy them
to the Clipboard.
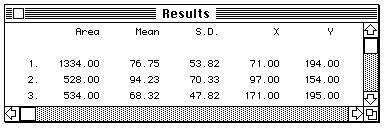
Area -
Area of selection in pixels. Area is in calibrated units, such as square millimeters,
if Set Scale has been used to spatially calibrate the image.
Mean -
Average gray value within the selection. This is the sum of the gray values of all
the pixels in the selection divided by the number of pixels. Reported in calibrated
units (e.g., optical density) if the Calibrate command has been used to calibrate
the image.
Standard Deviation -
Standard deviation of the gray values used to generate the mean gray value.
X-Y Center
- Center of the best fitting ellipse, measured from either the upper left or lower
right corner of the image, depending on the status of the Invert Y Coordinates
check box in the Preferences dialog box. This is the geometric center of the selection,
not the density weighted center. This option is automatically enabled when the cross
hair tool is used.
Modal Value -
Most frequently occurring gray value within the selection. Corresponds to the highest
peak in the histogram.
Perimeter/Length -
Length around the outside of the selection, or line length for line selections. The
perimeter is not computed for composite selections created using the control and
option keys. This option is automatically enabled when Measuring a line selection.
Major/Minor Axis -
Lengths of the major and minor axes of the best fitting ellipse.
Angle -
Angle between the major axis and a line parallel to the x-axis of the image, or an
angle measured using the angle tool. This option is automatically enabled when the
angle tool is used.
Integrated Density -
Sum of the gray values in the selection, with background subtracted. Use to measure
the size (volume) of spots or bands in electrophoresis gels. It is computed using
the following formula:
IntegratedDensity = N * (Mean - Background)
where N is number of pixels in the selection, and Background is the modal gray value
(most common pixel value) after smoothing the histogram. Note that this formula assumes
that the background is lighter (has lower pixel values) than the object being measured. The background level may be computed incorrectly if there isn't a well defined
peak in the histogram. This can happen if not enough background is included within
the selection or the background is not very uniform.
Min/Max -
Minimum and maximum gray values within the current selection.
User 1, User 2 -
Add new columns to the results table that can be used by user written macros to record
and display derived results. Several example macros in the file "Measurement Macros"
display results using User 1
and User 2
.
When Redirect Sampling
is checked, pixel data for calculating the mean gray value is taken from the corresponding
area of a second image. Requires that exactly two image be open, and that they be
the same size.
The wand tool includes interior holes in area and mean density computations if Include Interior Holes
is checked. If Wand Auto-measure
is checked, the Measure command is automatically invoked whenever an object is outlined
using the wand tool. Adjust Areas
is used by the Gel Plotting Macros to attempt to correct for the tendency of the
wand tool to underestimate the size of small peaks by not counting pixels under the
peak boundary. When this option is selected, the area is increased by 0.5*Perimeter
+ 1.5*AspectRatio, where AspectRatio is the width to height ratio of the selection's bounding
rectangle.
If Headings
is checked, column and row headings will be added to results Copied to the Clipboard
or Exported to a text file.
Max Measurements
specifies the size of the arrays used to hold results produced by the Measurement
command, by Analyze Particles, and by the angle and cross hair tools. You must Quit,
and restart Image
before the change will take effect.
Field Width
specifies the column width, in characters, for results displayed in the Results window,
Printed, Copied to the Clipboard, or Exported. Digits to the Right of Decimal Point
specifies the number of digits that follow the decimal point.

Setting Pixel Aspect Ratio
to a value other than 1.0 enables support for different horizontal and vertical spatial
scales, for example 100 pixels/cm horizontally and 95 pixels/cm vertically. Before
setting the aspect ratio, calibrate to a known horizontal distance. Then enter the
pixel aspect ratio into Pixel Aspect Ratio
. To find the pixel aspect ratio, measure the width and height (in pixels) of a digitized
object with a known 1:1 aspect ratio. The pixel aspect ratio is computed by dividing
the width by the height. Note that only the horizontal scale is shown. Divide the horizontal scale by the aspect ratio to compute the vertical scale. Note that the
Measure command sets the ellipse major and minor axis lengths to zero when the pixel
aspect ratio is not one.
Once the scale is set, you can switch to other units of measurements, for example
from inches to centimeters. If you know what the scale for an image is (e.g., 300
dpi), then that value can be directly entered into Scale
. Select Pixels
from the pop-up menu to disable spatial calibration. To use a unit of measurement
that is not predefined, select Arbitrary Units
and manually type in the unit. As a shortcut, double-click on the line selection
tool to bring up the Set Scale dialog box. Note that Image
displays a black diamond in the title bar of spatially calibrated images.
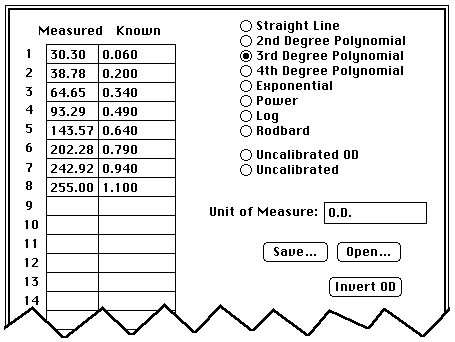
When you have finished making the measurements, select Calibrate to display the calibration
dialog box. To calibrate the image, enter the actual values in the Known
column, select a curve fitting method, enter the unit of measurement, and click OK.
If the calibration curve is not satisfactory, bring up the Calibrate dialog box again
and select a different curve fitting method.
Rodbard
is a four parameter general curve fit function proposed by David Rodbard at NIH.
The form of the equation is: y = (D) + (A - D) / (1 + (x/C)^B).
Selecting Uncalibrated OD
causes Image
to convert gray values to uncalibrated optical density values using the following
function:
Uncalibrated OD = log10(255 / (255 - Gray Value))
You do not need to measure OD standards or enter known OD values to enable this feature.
Pressing Invert OD
performs the following function on the entered (known) standards:
Inverted OD = -log10(1.000 - 10^(-Entered OD))
Optical densities are converted to transmission, subtracted from perfect transmission
and converted back to OD yielding the reciprocal density. This function is of use
to those who have a positive set of optical density standards but a photographic
or other negative image. It is also of use to those who quantitate reflected light images
but wish to specify results in terms of transmitted light. This is often the case
in anatomical imaging. Entered optical densities must range from 0.00001 to 4.62.
The Save button allows you to save both measured and known values to a text file so they can be restored later using the Open button. If there are no measured values (count=0), Open restores both the measured and known values, otherwise, only the known values are restored.
If you hold down the option key when invoking Calibrate you will be allowed to change
the measured values. This feature allows you to enter measurements acquired previously
or acquired from another system.
Note that Image
displays a white diamond in the title bar of density calibrated images.